Saturday, August 31, 2019

Engraving with the Cricut

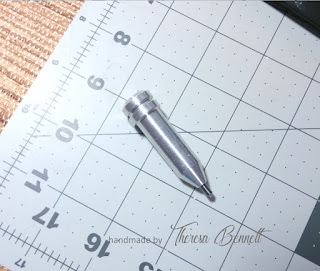
I've been trying to make some little engraved blanks with my new engraving tip for my Cricut Explore Air 2. The tip I got from Chomas Creations works in the cut side of my machine (the B side). And it's very pressure sensitive.


The first cuts I tried were on a special aluminum setting and they were too deep so they were not very pretty. I learned through trial and error to lighten up the settings and really stick the metal down to the mat with extra tape and DSST to keep it from shifting during a cut.

I think it would be more accurate if the tool were on the A side but it will not fit there so I've wasted a lot of blanks trying to get it right. There should be better instructions with this tool and it's use in each machine. It's not precise enough to do really small things I've found because my Cricut design space grid did not line up perfectly with the mat grid.


If  I'm making a tag for my dog, he really doesn't care if it's a little off center but as a personalized gift for someone I want it to be near perfect as I can get it. More practice is needed and a lighter touch I think on the machine settings. But I did go ahead and keep them. It cut off the last letter on the really tiny blank. If it's just a little off you can add some bling (with jeweler's glue or super glue)  to help balance it out a little but - more practice is necessary until I get my grids to line up perfectly.


I love this tool so it's definitely worth it's price. You can engrave all types of soft metals with it. This tool will even etch acrylic.

Monday, August 26, 2019

Freehand Foil Quilling

I digitize a lot of graphics that I get in the public domain and in library archives. I love to be able to print them out at will. And I love to add foil to them. Up until recently I just had to re-color the shiny gold with a gold flat color to get them to print.


If you scan in a graphic that has gold or silver foil on it already, it will show as black most of the time. I just change the color in my graphic program to a flat yellow gold or a light grey so it would print out right then I would just cover it with glitter to get a little bit of a shine. Now I can actually add gold foil to my graphics and this is how I do it with my Foil Quill pens by WeR Memory Keepers.


Go get some white tissue paper at the Dollar Tree. You get a lot for just one dollar. Lay it over your print and sticky tape it (DSST) to a part of the graphic that you are not going to foil so you can move the foil (shiny side up) between the papers around the edges. I DSST'd the center of this one. Trace the parts you want to foil with a pencil or pen. Then just draw the heat tool right on top of the tracing paper where you drew your lines.

The tool is hot enough to set the foil but not hot enough to burn the paper.


Just foil on the lines with the tip you want - fine, medium, thick or calligraphy. You can see where the tool burnishes the tissue but you can lift the edges and check and see how it looks as you go to fill in the places you might have missed.

Don't remove the tissue until you are finished foiling. Just lift your tissue off the graphic and it should be foiled where you want.

So there are two complete sets of pens, one set for machine foiling and one set for hand (freestyle) foiling.

Now that's foiling freestyle! You can foil anything with these pens. This puts another great tool in your arsenal of crafting goodies so you can make anything and make it look professional!


Wednesday, August 21, 2019

Gift Box Slider Cards

I don't want my cards to look like everyone else's cards so I often change them up. I use papers I already have to cut out new pieces and I switch up the tags I've made and collected previously to get the look I want.


This makes a pretty card and you can add as many embellishments as you like. The box slides open to reveal it's sentiment.


This is such an easy card to put together. It's the third in a series of Anna Griffin slider cards that are being offered in single shipments but were originally done as a set of auto shipped cards.

I really like making these. I've digitized the pieces to be cut out on my Cricut and whatever paper I choose. The trick here is to use very heavy weight card stock so your top will slide up without warping and easily slide back into the box.

Very pretty and fun to make!

Saturday, August 17, 2019

Too Early for Halloween?

Methinks not! It's not too early for the holidays in craft land. You have to plan ahead to get everything made. Well I fell in love with the Anna Griffin Haunted House dies and so did everyone else! I did get mine ordered but they went like hotcakes at a lumberjack picnic! Craft day at HSN happens about once a month. They finally did arrive and I got busy.


Be advised - if you love tiny pieces and putting together many, many little parts to this set, then go for it. Handling all these tiny pieces can be tedious. You will have to poke out tiny pieces from the dies with some of the cuts. I'm probably most afraid of losing some of these little bitty pieces.

I really don't like the new big magnets the dies come on that will only fit in magazine racks but I'll make do. I saw a magazine rack set at Joann's with a see-through dust cover on sale. I might get one of those. I have a box for tall dies already so I'll find a use for the magnet.

I do wish Anna's sets were digital. Some of them are - but not all of them. This would be perfect to digitize.

I drew my own little pieces and cut them out by hand on this one before my dies got here.


I just got some beautiful new papers with foil and vellum at Joann's last week. They are a Park Lane stack called C'est La Vie. They happened to have some black and orange papers in them. Perfect!

I will be making more of these.


Friday, August 9, 2019

Foil Quilling Anyone?

I just love the way foil adds so much to a card. You can't see all the beauty in this photo but this rose gold foil looks absolutely stunning on this card. There are a few ways to get foil in your projects but this is the most fun and most professional look out there, I think. With the fine tip you can write and do tiny things as small as one inch. The medium tip is used for most things and the large tip will foil and fill in big designs.


I love to foil over stamps with a glue pad and run them through my Heidi Swapp Minc. Then I cut them out for using on my cards. But this is for all the electronic cutting machines like my Cricut Explore Air 2.


You can also get little thumb drives of line drawings but they all looked like pretty simple drawings to me. You can get much more sophisticated stuff to foil in design space.

HSN had them on sale 40% off of that price and on the easy payment plan it was a no-brainer. Even Amazon had them on sale for around $50. And Joanns recently had them at 50% off for only one day in July but you had to go online to see what the sale of the day was. It was a "Shark Week" sale just for July. Things were listed daily on their site and not tagged as a sale item in their stores or weekly sales ads. This sale snuck up on you... like a shark!

You place on the mat your card (or other material) and then the foil down held with paper tape, and the heat pen foils your design through Cricut design space. It comes with four attachments and fits most all machines. It will work on the Cricut Maker, Explore Air 2, Silhouette, Brother and most electronic cutting and scoring machines.

The starter kit comes with foil samples but you want to get some larger rolls to play with. Is there anything my Explore Air 2 can't do? Look at all these foil colors! You can also get them on 12" x 8 ft. rolls. These little pre-cut packs are 4" x 6" and you get 30 sheets. That's the equivalent of a 12" x 5 foot roll. Do the math. If you want to try a bunch of colors then get the pre-cut packs. Sometimes they are cheaper than a roll per square footage. Always check for a sale.


Cricut (and other electronic machines) say NOT to use any accessory that's not expressly made by them or you will void your one year warranty if your machine should need repairs. That includes pen holders made by other people but that never stopped me from using what I wanted with mine. The pen holder in the Explore Air 2 easily pops out and you can even make your own accessories that IMO will not damage your machine but it will make it more versatile. It's up to you.


UPDATE AUGUST 13, 2019

And, WRMK (We R Memory Keepers) just released the freestyle foil quill pens that you can use with stencils or freehand. They are on HSN today with an autoship for future foil and stencilling packs. Go get them - they will never be this cheap in the stores!

They come in four tips - fine, regular, heavy and calligraphy. You would use those on anything that won't fit under your machine head. Or, if you don't want to take a chance on voiding your warranty. I will have both sets. I love the intricate work that Cricut does with the foil pens and I love being able to freestyle my writing on anything.

Can you imagine being able to foil anything you want??? Anything! You can use stencils or trace over a light box OR print designs on thin paper and use that as a guide. There's a whole lot of possibilities for these pens. Love it!

All these new toys keep me so busy.


Sunday, August 4, 2019

Cake Anyone?

NEW CARD DESIGN

This one was frustrating. I know they say not to re-invent the wheel but I wanted my version of this little cake pop-up card to be unique. Like I start all my cards with the size of 5" x 7" dimensions, that's how I started this one.


It has a center mechanism that helps make the cake tops look a little flatter. And it's a standalone card. It is not attached to a card that won't lay flat. The base, mechanism and catch all keep it 3D and straight. That was the biggest challenge on this one. How to make it look round and flat on top without looking like it had been folded at all.


The back is almost as pretty as the front. I decorated it with embossing. I used Anna Griffin's "Rosa" embossing folder. I also used matte and shiny gold foil paper. I used a little gold roll bling but the bigger part of it is the gold foil butterflies. They are from the Anna Griffin Garden Cards and Embellishments digital Cricut cartridge.

What makes them foil? The butterflies are only about an inch wide so I used the fine tip Foil Quill and gold heat-reactive foil to make them in Cricut design space.

The card folds flat and fits into a regular 5" x 7" envelope. There is room on the card bottom to write a message.


I love designing cards that stand up on their own as 3D paper sculptures. I can think of so many different ways to decorate and make this card in different shapes and colors. This would make a beautiful anniversary card.


Friday, August 2, 2019

How to Get Unlimited Graphics for FREE

There are many resources on the web for public domain graphics that you can go get for free. Take advantage of all the free sites out there to build your own digital library.

One good source for free graphics is the Graphics Fairy. They have a lot of freebies but you can access the motherlode for a monthly fee if you want. Libraries are another good source. Check the libraries online for most major cities. Don't forget to check your local library too especially for those Dover cd collections. You can use those too.


Another free site I like is Far Far Hill. That site is on its way out though. It hasn't been updated since 2018 so hurry and go get what you want from it before it disappears too. You can download free paper sets and print off your own paper. There are also some graphic sets there too.

You can print off a zillion times any graphic over and over and cut them out so you don't ever have to buy them pre-printed again unless you just want to. I have an archive of images on two external 100 gig hard drives and many I've pulled off onto disks for storage. You should see my stash of angels, flowers, butterflies, birds and Holiday images. You can upload them to cricut and cut them out or just print them out and cut them by hand.

One of the first graphics sites I discovered online was Pat's Web Graphics. I loved that site. I wish I had gotten those cd's when I had the chance because her site is no longer up. She had the most amazing flower graphics and free web sets I had ever seen. She really knew how to work with flowers. You can go see what I mean at the Wayback Machine . Just look it up. Here's a sample of some of her flowers. I still have some of her sets. I believe she designed them with PaintShop Pro. It was a great program when Jasc had it... not so much after Corel bought them out. The same thing happened to Flash. It was great until Macromedia sold it to Adobe... time marches on. You can still find some great programs and freebies out there for working with graphics.


Scan them in. Any graphics you have that you want to print out - just scan them in and print them over and over again. Digitize everything. It's legal for your own personal use.

You could take all your old paper punches and digitize cuts of them if you wanted and just cut them out with your Cricut. Same thing with your decorative edged scissors and even your stamps. Just digitize them and upload them to Cricut design space and you can print and cut them out until the cows come home. And that's how you get unlimited graphics for FREE.